GUI (Graphical User interface)
Python has a huge number of GUI frameworks (or toolkits) available for it. One of them, Tkinter, is traditionally bundled with Python, using Tk. Click here to see numerous GUI toolkits. In this tutorial we will use Tkinter only. Python 3 was used to create the GUI. The major difference is the 'case' in Python 2.7 and 3, for example instead of 'Tkinter' you will have 'tkinter' so please be careful as you will have to make changes if you wish to run the code in Python 2.7
So let us start..
STEP 1: Window (Download the file from here)
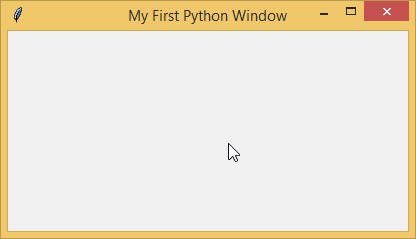
First of all we need a window. So let us create a blank one. Copy the following code into a new file and run it after saving or alternatively you can download the file and run it. The link is provided above. A new blank window should open and it should have the title "My First Python Window"
import sys
from tkinter import *

myFirstGui = Tk()
myFirstGui.geometry('400x200+200+100')
myFirstGui.title('My First Python Window')
myFirstGui.mainloop()
The parameters of geometry has the following meanings
Width = 400, Height = 200, Location of window from left = 200, Location of window from top = 100
The last line is necessary in windows operating system but is not to be written on Unix and MAC.
Screenshot of Output is shown below.
STEP 2: Label (Download the file from here)
Let us now add a label "Learning Python GUI', right in the middle-top of the window. For this you can just add one line (the second last line) to the previous code or you can make a new file. You can name the file what ever you want but it is a good idea to name the file according to the contents. So I will name it as 'LearningLabels01.py'. Note that the File name uses UpperCamelCase syntax (first character of all words is capital), while for variables, I am using lowerCamelCase syntax (first character of all words is capital except the first word).
import sys
from tkinter import *

myFirstGui = Tk()
myFirstGui.geometry('400x200+200+100')
myFirstGui.title('My First Python Window')
myLabel01 = Label(myFirstGui, text = 'Learning Python GUI', fg = 'red', bg = 'yellow').pack()
myFirstGui.mainloop()
The "pack" command is used to put label in the center of the screen.
Screenshot of Output is shown below.

STEP 3: Place (Download the file from here)
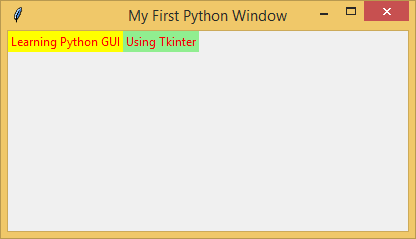
In this step we will make another label and place both labels where we want them!
import sys
from tkinter import *

myFirstGui = Tk()
myFirstGui.geometry('400x200+200+100')
myFirstGui.title('My First Python Window')
myLabel01 = Label(myFirstGui, text = 'Learning Python GUI', fg = 'red', bg = 'yellow').place(x = 50, y = 100)
myLabel02 = Label(myFirstGui, text = 'Using Tkinter', fg = 'red', bg = 'lightgreen').place(x = 50, y = 150)
myFirstGui.mainloop()
Screenshot of Output is shown below.

STEP 4: Grid (Download the file from here)
In this step we will make another method to place both labels where we want them! Grid will be used when we want to develop a table.
import sys
from tkinter import *

myFirstGui = Tk()
myFirstGui.geometry('400x200+200+100')
myFirstGui.title('My First Python Window')
myLabel01 = Label(myFirstGui, text = 'Learning Python GUI', fg = 'red', bg = 'yellow').grid(row = 0, column = 0, sticky = W)
myLabel02 = Label(myFirstGui, text = 'Using Tkinter', fg = 'red', bg = 'lightgreen').grid(row = 0, column = 1, sticky = W)
myFirstGui.mainloop()
"Sticky" is used to align it. "W" stands for west. Never mix pack and grid in the same master window
Screenshot of Output is shown below.
STEP 5: Button (Download the file from here)
We will now add a button to our window, that when clicked will display "Hello World". For this we will have to define a function, 'myHello', which will be called when the button is pressed using 'command'. Note that the last line on the define block should be 'return'.
import sys
from tkinter import *

def myHello():
	myLabel03 = Label(myFirstGui, text = 'Hello World', fg = 'blue').grid(row = 3, column = 0, sticky = W)
	return

myFirstGui = Tk()
myFirstGui.geometry('400x200+200+100')
myFirstGui.title('My First Python Window')
myLabel01 = Label(myFirstGui, text = 'Learning Python GUI', fg = 'red', bg = 'yellow').grid(row = 0, column = 0, sticky = W)
myLabel02 = Label(myFirstGui, text = 'Learning Python GUI', fg = 'red', bg = 'lightgreen').grid(row = 0, column = 1, sticky = W)
myButton01 = Button(myFirstGui, text = 'Click Me!', command = myHello, fg = 'red', bg = 'lightblue').grid(row = 1, column = 0, sticky = W)
myFirstGui.mainloop()
Screenshot of Output is shown below.

STEP 6: Entry (Download the file from here)
We will now get user input through an 'entry' (textbox) and then display that as a label
import sys
from tkinter import *

def myHello():
	myText = myEntry.get()
	myLabel03 = Label(myFirstGui, text = myText, fg = 'blue').pack()
	return

myFirstGui = Tk()
myEntry = StringVar()
myFirstGui.geometry('400x200+200+100')
myFirstGui.title('My First Python Window')
myLabel01 = Label(myFirstGui, text = 'Learning Python GUI', fg = 'red', bg = 'yellow').pack()
myLabel02 = Label(myFirstGui, text = 'Learning Python GUI', fg = 'red', bg = 'lightgreen').pack()
myButton01 = Button(myFirstGui, text = 'Click Me!', command = myHello, fg = 'red', bg = 'lightblue').pack()
myEntry01 = Entry(myFirstGui, textvariable = myEntry).pack()
myFirstGui.mainloop()
Screenshot of Output is shown below.

STEP 7: Menu (Download the file from here)
We will now create a menu-bar and some menu-items.
import sys
from tkinter import *

def myHello():
	myText = myEntry.get()
	myLabel03 = Label(myFirstGui, text = myText, fg = 'blue').pack()
	return

myFirstGui = Tk()
myEntry = StringVar()
myFirstGui.geometry('400x200+200+100')
myFirstGui.title('My First Python Window')
myLabel01 = Label(myFirstGui, text = 'Learning Python GUI', fg = 'red', bg = 'yellow').pack()
myLabel02 = Label(myFirstGui, text = 'Learning Python GUI', fg = 'red', bg = 'lightgreen').pack()
myButton01 = Button(myFirstGui, text = 'Click Me!', command = myHello, fg = 'red', bg = 'lightblue').pack()
myEntry01 = Entry(myFirstGui, textvariable = myEntry).pack()

# <- is used to write comment - Following block will create a menu
# START menu block
myMenuBar = Menu (myFirstGui)

myFileMenu = Menu (myMenuBar , tearoff = 0)
myFileMenu.add_command(label = "New")
myFileMenu.add_command(label = "Open")
myFileMenu.add_command(label = "Close")
myMenuBar.add_cascade(label = "File", menu = myFileMenu)

myHelpMenu = Menu (myMenuBar , tearoff = 0)
myHelpMenu.add_command(label = "About")
myMenuBar.add_cascade(label = "Help", menu = myHelpMenu)

myFirstGui.config(menu = myMenuBar)
# END menu block

myFirstGui.mainloop()
Note that these menu items do nothing yet
Screenshot of Output is shown below.

STEP 8: Message (Download the file from here)
You must have noticed that in previous step we have added commands but have not defined them yet. We will do this in this step and also create message boxes. For that we need to define few commands (functions). Notice that we have added another import statement here for messagebox. Also notice that the function of 'New' menu item is just to show that it has been clicked and it does not open a new file.
import sys
from tkinter import *
from tkinter import messagebox

def myHello():
	myText = myEntry.get()
	myLabel03 = Label(myFirstGui, text = myText, fg = 'blue').pack()
	return
def myFileNew():
	myLabel04 = Label(myFirstGui, text = 'You choose NEW').pack()
	return
def myHelpAbout():
	messagebox.showinfo(title = 'About Me!', message = 'Created for Python People')
	return
def myFileClose():
	myExit = messagebox.askyesno(title = 'Quit?', message = 'Are you sure?')
	if myExit > 0:
		myFirstGui.destroy()
		return

myFirstGui = Tk()
myEntry = StringVar()
myFirstGui.geometry('400x200+200+100')
myFirstGui.title('My First Python Window')
myLabel01 = Label(myFirstGui, text = 'Learning Python GUI', fg = 'red', bg = 'yellow').pack()
myLabel02 = Label(myFirstGui, text = 'Using tkinter', fg = 'red', bg = 'lightgreen').pack()
myButton01 = Button(myFirstGui, text = 'Click Me!', command = myHello, fg = 'red', bg = 'lightblue').pack()
myEntry01 = Entry(myFirstGui, textvariable = myEntry).pack()

# <- is used to write comment - Following block will create a menu
# START menu block
myMenuBar = Menu (myFirstGui)

myFileMenu = Menu (myMenuBar , tearoff = 0)
myFileMenu.add_command(label = "New", command = myFileNew)
myFileMenu.add_command(label = "Open")
myFileMenu.add_command(label = "Close", command = myFileClose)
myMenuBar.add_cascade(label = "File", menu = myFileMenu)

myHelpMenu = Menu (myMenuBar , tearoff = 0)
myHelpMenu.add_command(label = "About", command = myHelpAbout)
myMenuBar.add_cascade(label = "Help", menu = myHelpMenu)

myFirstGui.config(menu = myMenuBar)
# END menu block

myFirstGui.mainloop()
Note that instead of 'messagebox.showinfo' you can many other options. Just wait after typing dot, '.', and you will be presented with options to choose from. For example 'messagebox.showwarning', 'messagebox.showerror', etc.
Similarly, instead of 'messagebox.askyesno' we can use 'messagebox.askokcancel' to display 'OK' and 'CANCEL'
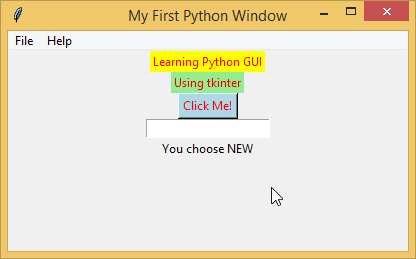
Screenshots of Outputs are shown below.
A simple message is shown when you click on File > New

The message is "You choose NEW"
Click on File > Close
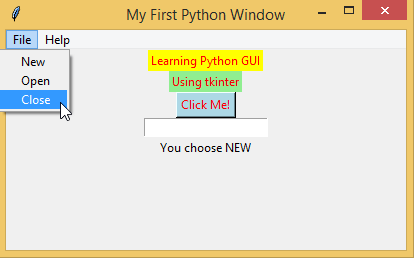
and you will get a message in the question form

Click on Help > About

and you will get a message as a info popup window

STEP 9: Dialog (Download the file from here)
Now let us define another function for menu item 'open ' and learn about the dialog box through it. Notice that we have added couple of import statements here for filedialog and colorchooser. Again the goal is to show how to bring up these dialog boxes and get their values that can be used in programming later but at present it is just displayed.
import sys
from tkinter import *
from tkinter import messagebox
from tkinter import filedialog
from tkinter import colorchooser

def myHello():
	myText = myEntry.get()
	myLabel03 = Label(myFirstGui, text = myText, fg = 'blue').pack()
	return
def myFileNew():
	myLabel04 = Label(myFirstGui, text = 'You choose NEW').pack()
	return
def myFileOpen():
	myOpen = filedialog.askopenfile()
	return
def myFileColor():
	myColor = colorchooser.askcolor()
	myLabel05 = Label(myFirstGui, text = myColor).pack()
	return
def myHelpAbout():
	messagebox.showinfo(title = 'About Me!', message = 'Created for Python People')
	return
def myFileClose():
	myExit = messagebox.askyesno(title = 'Quit?', message = 'Are you sure?')
	if myExit > 0:
		myFirstGui.destroy()
		return

myFirstGui = Tk()
myEntry = StringVar()
myFirstGui.geometry('400x200+200+100')
myFirstGui.title('My First Python Window')
myLabel01 = Label(myFirstGui, text = 'Learning Python GUI', fg = 'red', bg = 'yellow').pack()
myLabel02 = Label(myFirstGui, text = 'Using tkinter', fg = 'red', bg = 'lightgreen').pack()
myButton01 = Button(myFirstGui, text = 'Click Me!', command = myHello, fg = 'red', bg = 'lightblue').pack()
myEntry01 = Entry(myFirstGui, textvariable = myEntry).pack()

# <- is used to write comment - Following block will create a menu
# START menu block
myMenuBar = Menu (myFirstGui)

myFileMenu = Menu (myMenuBar , tearoff = 0)
myFileMenu.add_command(label = "New", command = myFileNew)
myFileMenu.add_command(label = "Open", command = myFileOpen)
myFileMenu.add_command(label = "Close", command = myFileClose)
myFileMenu.add_command(label = "Color", command = myFileColor)
myMenuBar.add_cascade(label = "File", menu = myFileMenu)

myHelpMenu = Menu (myMenuBar , tearoff = 0)
myHelpMenu.add_command(label = "About", command = myHelpAbout)
myMenuBar.add_cascade(label = "Help", menu = myHelpMenu)

myFirstGui.config(menu = myMenuBar)
# END menu block

myFirstGui.mainloop()
Screenshots of Outputs are shown below.
Click on File > Open
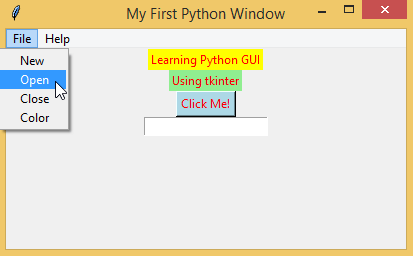
and you will be presented with the file dialog window from where you can choose a file. Of course nothing will happen yet as we have not written any code yet

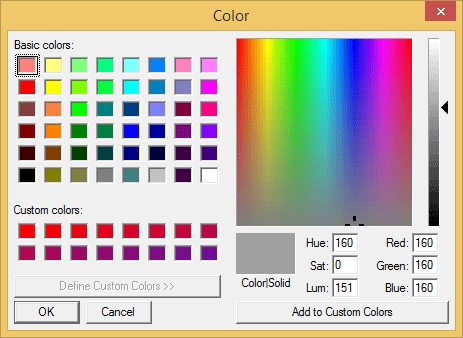
Same with the colour chooser. Click on File> Color
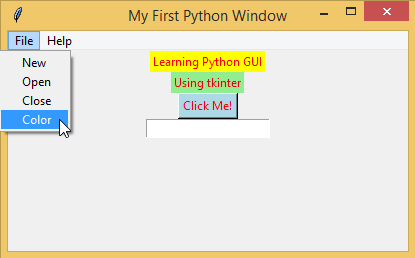
you will be presented with a colour choosing window
STEP 10: CheckedMenu (Download the file from here)
You must have seen menu items that work like toggle buttons. When you click on them a tick mark appears next to them showing they are activated and it unchecks when you click on it again.
Now let us define another function for menu item 'open ' and learn about the dialog box through it. Notice that we have added couple of import statements here for filedialog and colorchooser. Again the goal is to show how to bring up these dialog boxes and get their values that can be used in programming later but at present it is just displayed.
import sys
from tkinter import *
from tkinter import messagebox
from tkinter import filedialog
from tkinter import colorchooser

def myHello():
	myText = myEntry.get()
	myLabel03 = Label(myFirstGui, text = myText, fg = 'blue').pack()
	return
def myFileNew():
	myLabel04 = Label(myFirstGui, text = 'You choose NEW').pack()
	return
def myFileOpen():
	myOpen = filedialog.askopenfile()
	return
def myFileColor():
	myColor = colorchooser.askcolor()
	myLabel05 = Label(myFirstGui, text = myColor).pack()
	return
def myHelpAbout():
	messagebox.showinfo(title = 'About Me!', message = 'Created for Python People')
	return
def myFileClose():
	myExit = messagebox.askyesno(title = 'Quit?', message = 'Are you sure?')
	if myExit > 0:
		myFirstGui.destroy()
		return

myFirstGui = Tk()
myEntry = StringVar()
myFirstGui.geometry('400x200+200+100')
myFirstGui.title('My First Python Window')
myLabel01 = Label(myFirstGui, text = 'Learning Python GUI', fg = 'red', bg = 'yellow').pack()
myLabel02 = Label(myFirstGui, text = 'Using tkinter', fg = 'red', bg = 'lightgreen').pack()
myButton01 = Button(myFirstGui, text = 'Click Me!', command = myHello, fg = 'red', bg = 'lightblue').pack()
myEntry01 = Entry(myFirstGui, textvariable = myEntry).pack()

# <- is used to write comment - Following block will create a menu
# START menu block
myMenuBar = Menu (myFirstGui)

myFileMenu = Menu (myMenuBar , tearoff = 0)
myFileMenu.add_command(label = "New", command = myFileNew)
myFileMenu.add_command(label = "Open", command = myFileOpen)
myFileMenu.add_command(label = "Close", command = myFileClose)
myFileMenu.add_command(label = "Color", command = myFileColor)
myMenuBar.add_cascade(label = "File", menu = myFileMenu)

myViewMenu = Menu (myMenuBar , tearoff = 0)
myViewMenu.add_checkbutton(label = "Hide")
myMenuBar.add_cascade(label = "Help", menu = myViewMenu )

myHelpMenu = Menu (myMenuBar , tearoff = 0)
myHelpMenu.add_command(label = "About", command = myHelpAbout)
myMenuBar.add_cascade(label = "Help", menu = myHelpMenu)

myFirstGui.config(menu = myMenuBar)
# END menu block

myFirstGui.mainloop()
Screenshots of Outputs are shown below.
Click on View > Hide
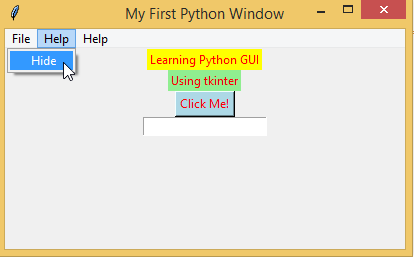
Again click on View and note that 'Hide' menu item now has a tick next to it.

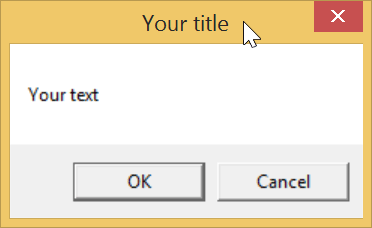
STEP 11: Messagebox (Download the file from here)
import ctypes  # An included library with Python install.
def Mbox(title, text, style):
    ctypes.windll.user32.MessageBoxA(0, text, title, style)
Mbox('Your title', 'Your text', 1)
The available styles are as follows:
Also in python 3, use MessageBoxW instead of MessageBoxA which is used in python 2.7
##  Styles:
##  0 : OK
##  1 : OK | Cancel
##  2 : Abort | Retry | Ignore
##  3 : Yes | No | Cancel
##  4 : Yes | No
##  5 : Retry | No
##  6 : Cancel | Try Again | Continue
Screenshot of Output is shown below.
STEP 12: Messagebox (Download the file from here)
Another Solution for python 3 is as follows
import tkinter as tk
from tkinter import messagebox

def text_box():
    if messagebox.askokcancel("Quit", "Are you sure?"):
        root.destroy()

root = tk.Tk()
button = tk.Button(root, text="Press the button", command=text_box)
button.pack()
root.mainloop()
Screenshot of Output is shown below. Initially, you will be presented with a button and when you click it, you will see following messagebox
The same solution can be made to run on python 2.7 by making a few changes
import Tkinter as tk
import tkMessageBox

def text_box():
    if tkMessageBox.askokcancel("Quit", "Are you sure?"):
        root.destroy()

root = tk.Tk()
button = tk.Button(root, text="Press the button", command=text_box)
button.pack()
root.mainloop()
I think this is enough to get the students started and now they can start experimenting on their own. I will make more tutorial on further topics and keep adding to this space. If you would like a tutorial on a particular topic, feel free to send me an email.